..................
....................................--- Aft Berth Storage ---
Before the fall of 2010 we had stored items in the aft berth on top of the mattress there. We wanted to keep the mattress just in case we slept there at some point. We never did as we always slept in the enlarged V-berth even when the ride might of been better aft.
Then I made the removable cockpit bed and Ruth made the cushions and bug net for it. We bought a queen size inflatable camping pad to use there on top of the cushions so that we wouldn't be bothered with the cracks between all of the cushions. Then we thought we could use it in the aft berth also as it was just wide enough to fit between the hull side and the frig. It rolls up and is pretty easy to store.
With it we could put the original aft mattress in storage and use the aft berth area for storage on our longer trips. This had two big benefits. One was that now there was more vertical storage room back there. Two it was easier to move around back there on the hard surface and there was more headroom to do so with the mattress gone.
..............
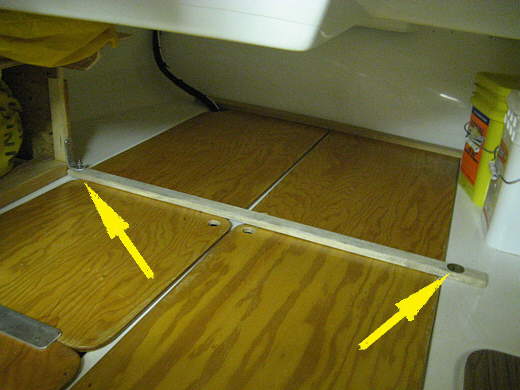
Lastly now it was real easy to access the storage compartments back there since you didn't have to lift or remove the mattress to get to them. Above you can see the 2 long storage compartments that are built into the bottom hull liner. The top left arrow points to wiring running to and from the stern in conduit. The bottom arrow points to a piece of decking that I cut off of the storage access on that side. It has the frig sitting on it just out of the picture. The black tubes are the old anchor tubes that we took on the first trip using the bow rollers, just in case they gave us problems, they didn't. On the right is a hatch that gives access to the bottom of the hull along the side.
..............
I drilled finger holes in the original hatch covers to make it easier to lift them (arrows).
..............
The part of the hatch cover that the frig sits on was screwed to the hull liner on 3 sides. You can still slide items in under it. You can see the frig to the left.
..............
Even though the compartments are easier to get to I stored items in them that we would have less need to get to as other items will be stored back here over the compartments. Here you can see a spare dinghy oar, prop, and a Fortress FX-11 anchor that is broke down. On this side I also stored tools and parts to fix the boat on the water if needed. Some of the port side compartment had battery powered drills/charger/spare batteries and quite a bit of can goods.
..............
Across the very back I screwed down a 1 X 2 on each end and the middle to the hull liner. The compartment hatch covers can slide back in under this permanent board. I want to make sure the hatch covers couldn't come off and open the compartments while heeling or in bad weather. The other board will be discussed shortly.
..............
A piece of bent aluminum was screwed to the permanent cover (lower arrow). The hatch cover aft of it slides in under it and is held by the aluminum strap. The 1 X 2 (top arrow) holds the other end of the cover down.
..............
Likewise another piece of strap was screwed in front of the forward port cover.
..............
In the middle is another 1 X 2 that can swing fore or aft in order to lift the covers out. It hinges on the right side and is pinned on the left side of the picture above.
..............
On the port side I put a bolt through the 1 X 2 and put a nylon lock nut on the bottom of the bolt under the hull liner. You can reach it via the side access hatch shown in the first picture above.
..............
The left side is pinned with a bolt with its head cut off that goes through the bracket, then through the 1 X 2 and through a hole in the hull liner. The pin just pulls out.....
..............
.... and you swing the 1 X 2 fore or aft in order to lift.....
..............
... individual covers off like above. Works really easily and you don't have to swing the 1 X 2 very far to be able to lift a panel out. We tried this out on our Fall 2010 Florida trip and really liked the whole deal and will keep using it. Above are parts, screws, bolts and electrical supplies.
..............
On the port side you will find a 12 volt Craftsman drill (love it), bits, loos gauge, parts and behind those items food back to the stern. I'm sure some of you are laughing at all of this, but I get kind of anal about being able to fix about any problem we might have when we are out there by ourselves.