.Our MacGregor Index Page.....Mac 26S Rigging Mods Index Page.........
....................... Previous Page...................................... Next Page If There Is One
=======================================================
...--- New Standing Rigging and Furler Forestay ---
=======================================================
NOTE: Your life and others depend on your rigging. Hopefully you are replacing it for that reason. Now that you are if you don't do an excellent job yourself you haven't gained anything safety wise. I decided to make up our new shrouds and backstay and invested in a swage tool. It isn't that cheap and is absolutely required to do the job right. If you have any doubts as to making up your own rigging take the money you would of spent on the tool and have the rigging made up by a rigging shop.
Now if you use the swage tool and the go-no-go gauge with it you should have no fears that the rigging will fail. Good luck and use this page for reference only and remember safety first.
.......
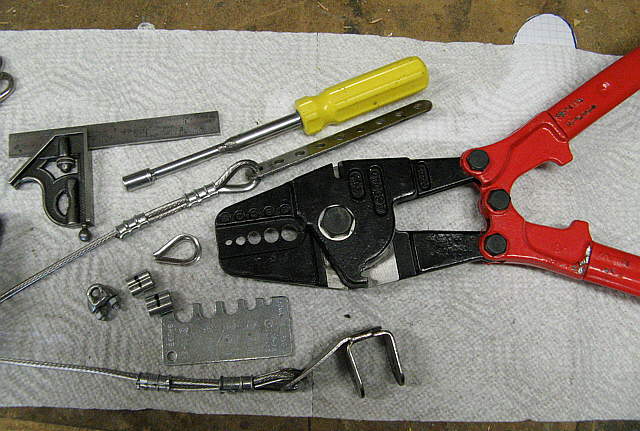
Above are the tools used during the job. The swage tool is a Tie Down #43005 26" Hand Swaging Tool, Cap: Sizes 1/16 to 3/16 Inch w/ Cutter. We bought ours for about $55.00, but searches I did while writing that came in at about $70. You will see other swage tools well over $100. This is a good tool and I recommend it. The adds don't always say it, but it comes, at least ours did, with a go-no-go gauge.
You can only use this tool to compress the sleeves used with the wire and thimbles. It is not a 'rotary' swage tool and should not be used to try and attach fittings to the end of the wire that require a round swage all the way around the fitting like say the top of a turnbuckle attached to a forestay. You have to have that done by a rigging shop.
The wire used was 5/32nd 316 stainless 1 X 19 from riggingonly.com. I made up the shrouds and backstay up from this and they made up a new 5/32 (original was 1/8th) forestay. The backstay could of been 1/8th, but I just wanted to keep all of the rigging the same size to simplify the material used.
.......
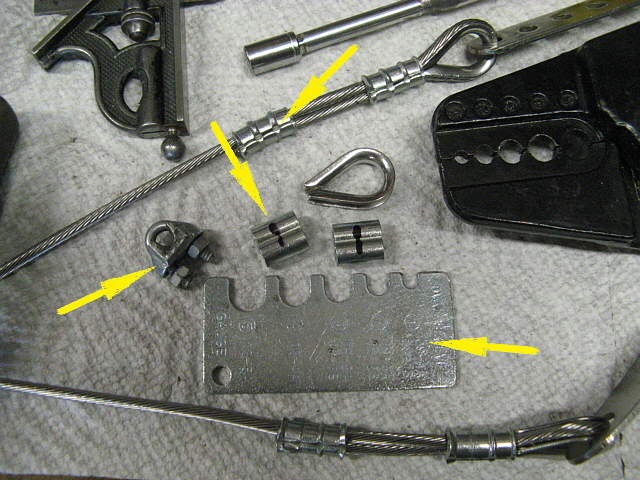
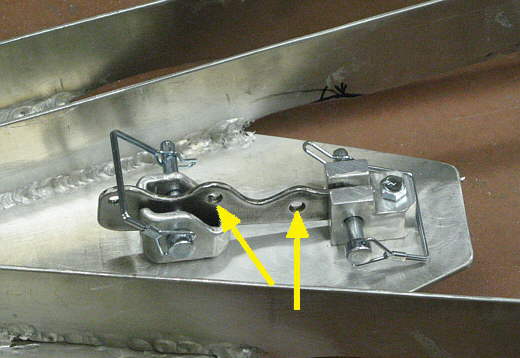
The sleeves, top arrow, get 3 crimps on them and the placement of the tool for the first one needs to be in the center of the sleeve. Mark that location with a rule, center arrow. The bottom right arrow points to the go-no-go gauge you will use by sliding it on the swaged sleeve to see if it is correct. The swage tool goes over-center when you use it, so there is not much doubt that you did the swage correctly, but still check it.
I use the cable clamps, left arrow, to help with assembly. You take the wire through the sleeves, around the thimble and back through the sleeves. The clamps will help you keep things in place while you swage the sleeves.
I found it helpful on some to get things in place and then put two pieces of wood in the jaws of my workbench vise and hold the thimble in the vice while I slid the sleeve up next to the thimble. That is the hard one to get tight up almost against the thimble. I did these alone, but a second person squeezing the cable at the thimble would help.
Also here is a tip from 'oreana123' on 'Ask A MacGregor Owner'.......
"One small detail worth adding is that it is OK to cut the little points off of the thimble, which will make a tight swage much easier. "
.......
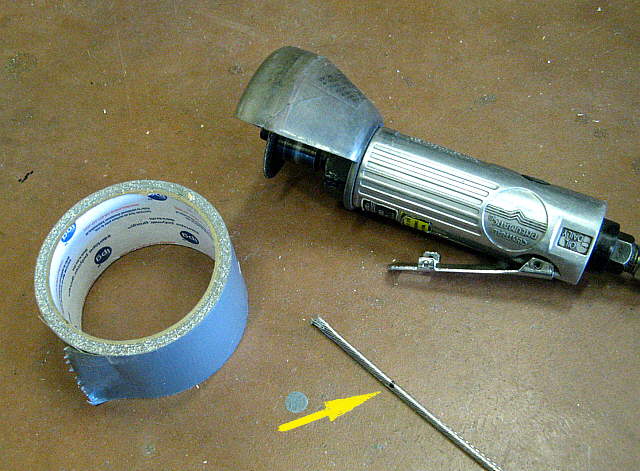
The swage tool has a cutter, but to be honest I didn't try it. I would wrap the wire with duct tape where the cut was to be made. Next mark the cut spot with a magic marker. Above I show the mark on the cable, but the tape should of been wrapped around the cable and the mark should be near the middle of the tape.
Then I used the cut-off wheel in the air tool to cut the wire. It gave a clean cut and I left the tape on until I was done or working with the bottom sleeve.
.......
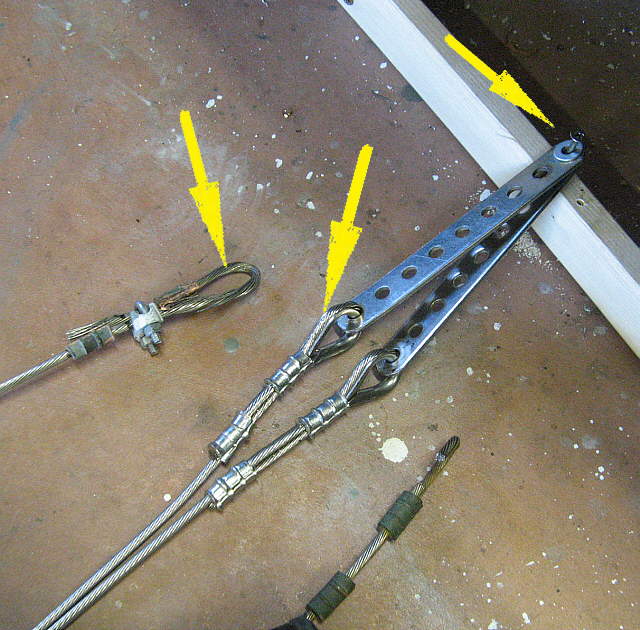
To start with take the rigging and put some tape around it and mark where it came from. Next I would measure the shrouds against each other and see if they are the same length or close to it. To measure the new and old shrouds I screwed a piece of 1 X 2 between two legs of my workbench, see above. Then I would screw the ends of the shrouds I was measuring or making to the 1 X 2 and stretch them out on the floor in the shop. You could also do this outside on say the driveway or some preferably hard surface.
If the shrouds are the same length or close to it work with one at a time so that you have the other one to use as a reference. Start by removing any hardware from only one side by cutting the wire.
.
If you are working with a single piece of rigging like the backstay and want to duplicate its length and need to remove the chain plate for instance try and remove the sleeves from the wire in such a way to keep the wire intact. I took the cut-off tool and cut through the sleeves on the old rigging and removed the chain plates form them.
Once the chain plate or whatever is removed use a cable clamp to restore the end on the wire for measurement purposes.
........
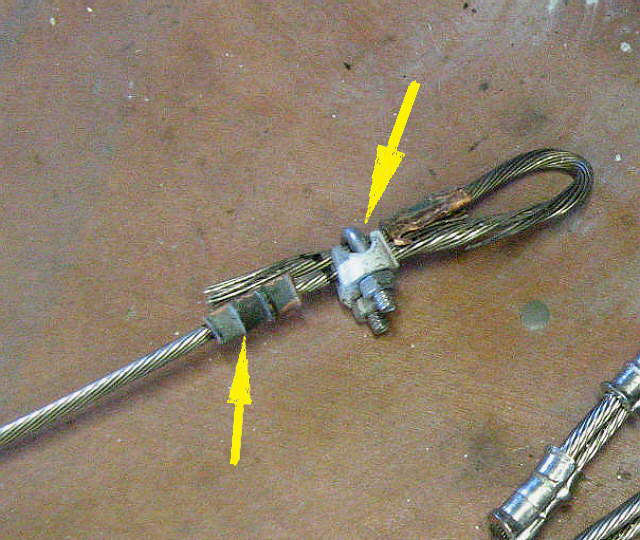
Above I'm finishing up the second of two shrouds. To begin with I would of put a thimble and two sleeves on new wire and swaged that end. Then I would of attached the one original shroud to the 1 X 2 along with the new finished end with the screw.
Next stretch them out on the floor and cut the wire the for the new at the right length. Slide the sleeves and thimble on the new wire and get the thimble in the same place as the old one next to it and use a cable clamp to hold it all in place. Next swage the sleeves on that end and you are done.
Now cut the hardware off the old shroud that you had just used to measure the new one and use the new one like in the picture above to make up the second one.
If it was the backstay for instance where you took the hardware off. Put the loop where the thimble was on the screw and measure the new one using that as a reference point.
Remember that you have adjustment at the chain plates so you are not measuring the over all length to 1/16 or 1/8th of an inch. It is nice to get the shrouds as close to one another as possible as that should help you tension the mast with it vertical side to side.
.......
I slid the plastic tubes on first while making the rigging up, but you can get them on later. I ordered new ones as they aren't that expensive.
............................................................--- The Furler Forestay ---
Next I'll show a little bit about how I did the forestay for the furler, but you need to make sure what you are doing is right for the furler you are using, your personal situation, and that you are on the same page with who is going to make up the forestay for you.
The fittings on the forestay for the turnbuckle and the top fitting need to be put on with a rotary swage, which requires a very expensive machine to accomplish that. I made my measurements and had riggingonly.com make up our forestay. They also furnished the new 5/16 inch turnbuckle and a toggle for the top and the bottom along with the wire and the thimbles and sleeves that I used for the standing rigging above.
I bought the new Johnson Lever through Defender Marine and it was not one they stocked, but they did a special order for it. I believe that most people are using the C. S. Johnson Model #14-205 lever. It is recommended for 1/8 inch cable sizes and uses a 1/4 inch pin. Since we were going to a 5/32nd inch forestay and wanted to go to 5/16 inch pins and turnbuckle we moved up to the.....
.... Model #14-210 that is a couple inches longer and has a SWL of 1600 lbs. vs. 1000 lbs. I believe it also has a little more adjustability with extra mounting holes. You could shorten it some by cutting off the extra couple holes at the top. Going to the 5/32 forestay and heavier gear is probably overkill, but we feel good about it considering the trips we take where conditions are never know beforehand. The Johnson lever makes it easy now to pin the forestay after raising the mast and have proper tension on the forestay. If you ever pin your stock forestay and then don't tighten the turnbuckle you will not have much tension on the forestay and shrouds. I know this from using a loos gauge on our rigging. I know people pin their forestays and don't tighten the turnbuckle afterwards and their mast hasn't fallen, but I don't recommend that. Even with the block and tackle we couldn't get proper tension on the forestay without adjusting the turnbuckle. If your rigging is loose while sailing it will put more strain on the rigging and the boat as it pumps around. Kind of like what is easier to hold, a steady load or one that is jerking against you?
With the Johnson lever you adjust the turnbuckle once and get the tension you are after checking with the loos gauge. Then from then on you pin the forestay with the Johnson lever open and then close it after pinning the forestay and you have the same tension on the rigging time after time.
Don't forget you are not just setting the tension on the forestay, but also the shrouds as they oppose the forestay. On the S the backstay is there mostly to shape the mast above the point where the forestay and upper shrouds attach. The mast should be raked back a few degrees, but straight between the upper shrouds and the deck, not vertical, but straight. If it is curved in that area work with the lower shrouds to make it straight. I strongly recommend borrowing or buying a loos gauge to get your rigging tensioned properly.
.......
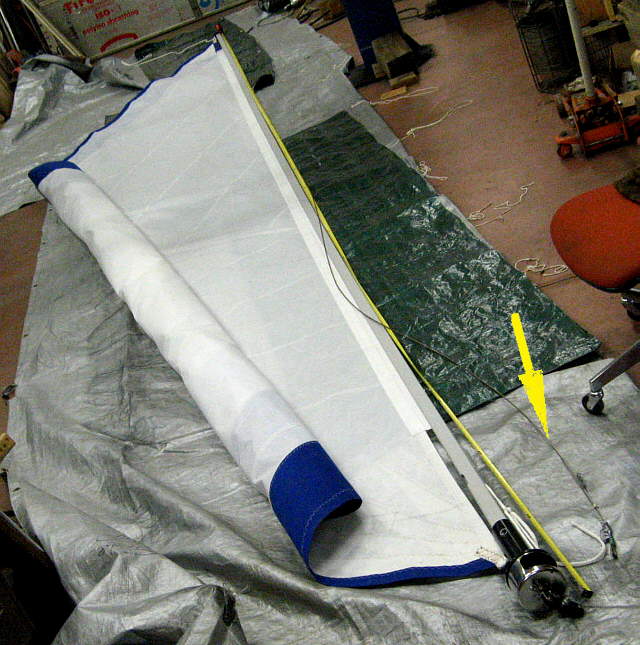
To determine the forestay length I needed I assembled the CDI furler and cut the foil to the length I wanted, which was a little longer than what it could of been as you will see. I knew that with the added length of the Johnson lever and some of the other fittings that I was going to raise the forestay up the mast some and also move the new upper shrouds to the same point, so wasn't worried about fitting the forestay/furler within the restrictions of the standard attach points on the deck and mast. If you are leaving the upper hounds on the mast in the factory location you need to pick your parts and measure your new forestay accordingly.
.......
In our case Rigging only wanted the length from the bottom of the turnbuckle to the attach point up at the hound where the forestay attaches to the mast. Then they made the forestay to the length needed to achieve that overall length. Be sure to check with them or whoever you are using for the measurement they want from you.
The top left arrow points to the tack of the sail and it ties to the drum just below there. I left it about that high above the drum to give me room to tie it off.
The top right arrow points to the pin you pull out if you need to slide the drum up the forestay to adjust the turnbuckle.
The bottom arrow above points to the old forestay that I just had laying there.
.......
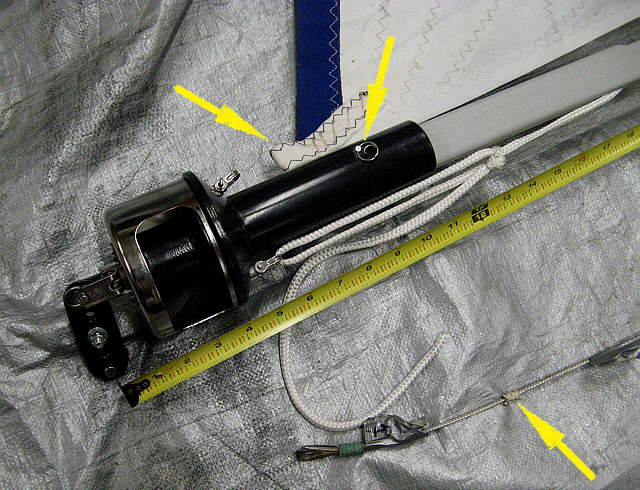
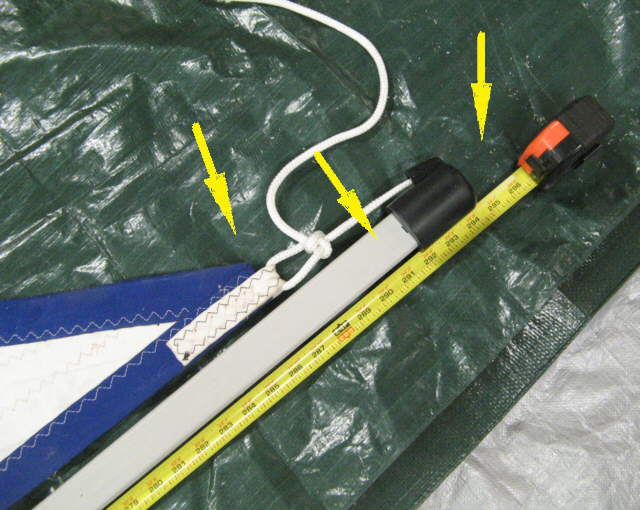
Here we are at the top and there again I left some room at the top of the sail for the knot and a short length of the up-haul line before it turns at the top fitting. The furler foil was a lot longer than this before I cut it to this length. The forestay could of been shortened by attaching the sail closer to the drum at the bottom and having it jammed up against the turning fitting at the top of the foil. In our case that would of shortened the forestay by probably 4-6 inches. I liked not cutting things that close just in case I had to pull the sail up for some reason.
..............................................
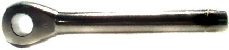
Rigging Only was going to swage a marine eye like above to the top of the forestay and I called CDI and they said that they would like to see the foil turn on the cable and not this fitting. That surprised me some, but I added length to the forestay to make sure the foil was below the fitting.
I gave Rigging Only the overall length I wanted from the bottom of the turnbuckle with it in the middle position to the eye on the fitting above and they made the forestay up to that overall length. There again make sure you and the rigger are using the same measurement locations.
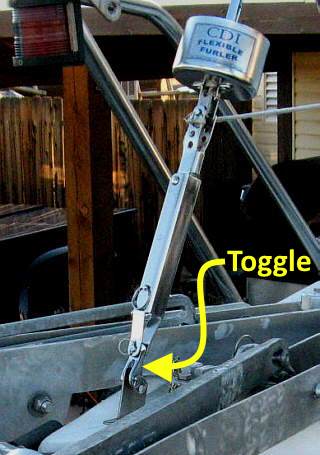
CDI also wants a toggle at both ends and I use one like this...
..........................
... standard eye toggle at the top and at the bottom...
..............................................
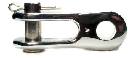
.... a forged eye jaw toggle. I probably could of skipped the bottom one due to how the ....
..........................
..... furler drum attaches to the Johnson Lever an how it pins to the deck. I bought the toggles from Rigging Only. Above you can see the additional toggle at the bottom of the Johnson Lever.
.......
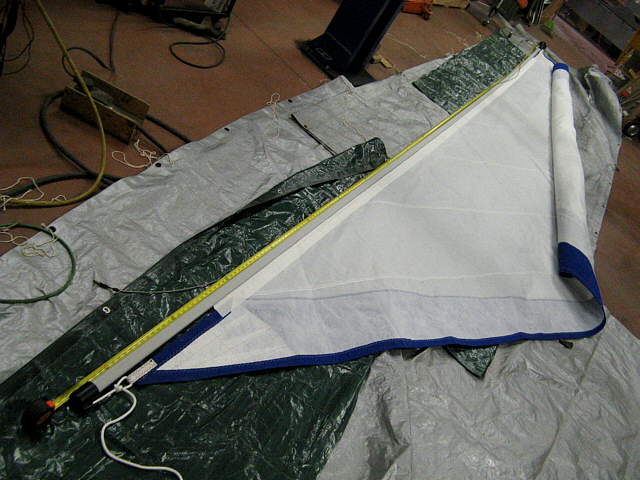
A view from the other end while taking the measurements. The sail as well as our new main are from Martin at Somerset Sails. The Genoa has a radial cut and is very well made. The UV protection in blue is Sunbrella Ocean blue to match the rest of our canvas. That wasn't a color Martin stocked, so we ordered it from Sailrite and they drop shipped it to him and he sent us what he didn't use. Be sure and get a quote from him if you are looking for a sail. He has great sails at very reasonable prices.
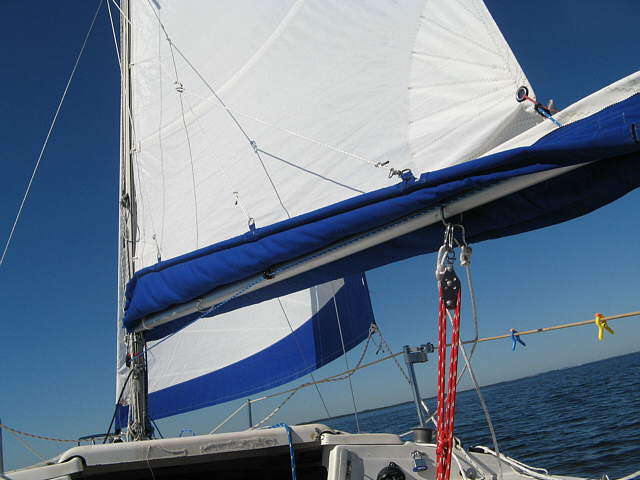
Here is a picture of the furler...
.......
..... on the water in Florida. We love the furler and how functional it is for us. Ruth and I also like the fact that with the Johnson Lever we can now see under the Genoa. With it a little higher and the center of pressure moved up slightly we might of changed the handling of the boat a little, but we haven't noticed that.
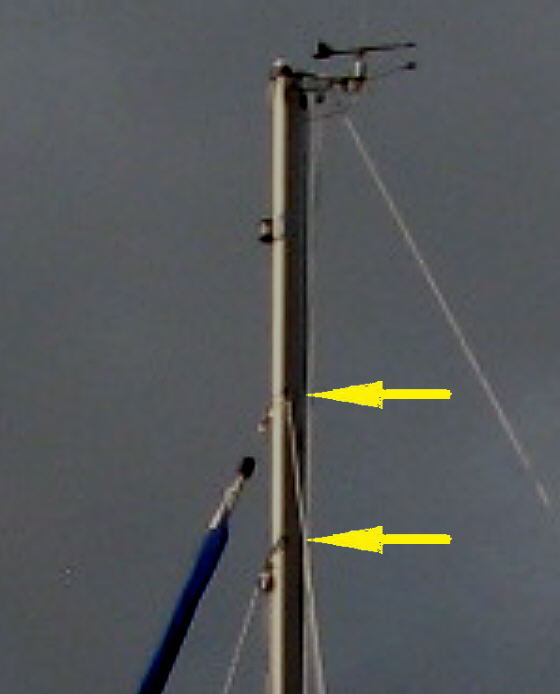
Ok how much did I move the new forestay up the mast?
...
The bolt hole for the new hounds/forestay is 23 1/4 inches above the bolt hole for the original hounds/forestay. It could of been a little lower considering a couple of things.
I had the forestay made up a few inches longer than was needed for the CDI.
Also the lower toggle is a little redundant since the bottom of the CDI drum acts like a toggle, but I do like the fact that we have toggles at the extreme ends of the furler/Johnson Lever/forestay combination. That can't hurt and would relieve any stress below the bottom of the CDI drum. Also if your forestay was 1/8th inch and you went with the shorter Johnson Lever that would also shorten the distance from the foredeck. to the hounds and result in them being lower.
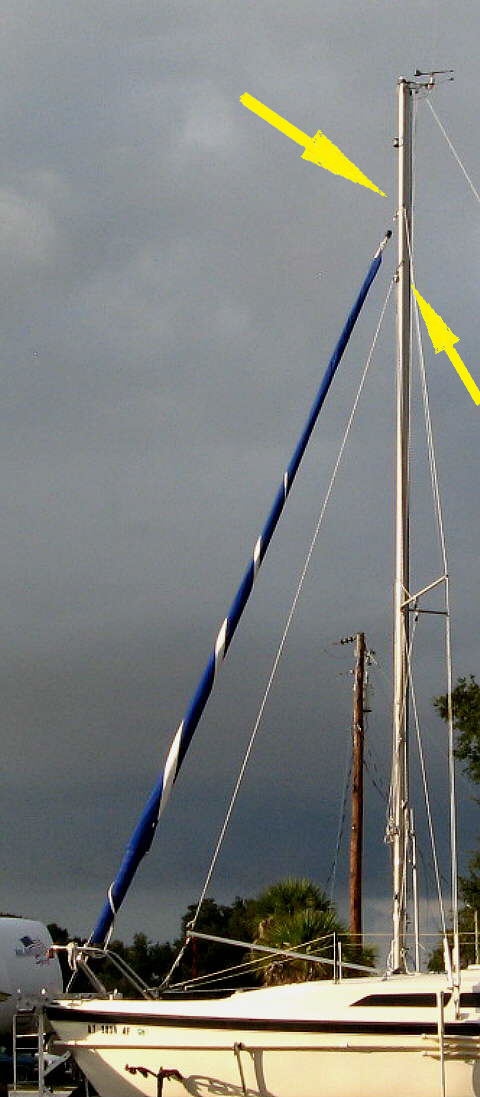
One last thought on this is that the 23 1/4 inches might seem like a lot but if you look....
.......
.....at the above picture you will see that the bottom of the sail isn't that much higher so the center of pressure hasn't been raised that much. The big, big gain for us and especially Ruth is that now you can see ahead under the sail.
Above the original jib halyard is attached to the gin pole as I had just raised the mast. It is still attached to the original hounds on the mast. Now take the bottom of that line and and imagine attaching it to the deck just aft of the bottom of the Johnson Lever.....
.......
..... like to the new mount I made when I made the anchor bow rollers. If you put a sail on it the sail would be just a little lower than the new setup. I don't think many people would ever notice the difference in sailing or heeling.
The advantages are great in that now you can pin the forestay quickly and with always the same tension with the Johnson Lever and you have more improved forward vision on the boat and of course a furler sail that is just a world of difference vs. a hank-on in terms of ease of use.
=======================================================
.................................................................................. Next Page If There Is One