..................
.........................................................--- Towbar for Dingy ---
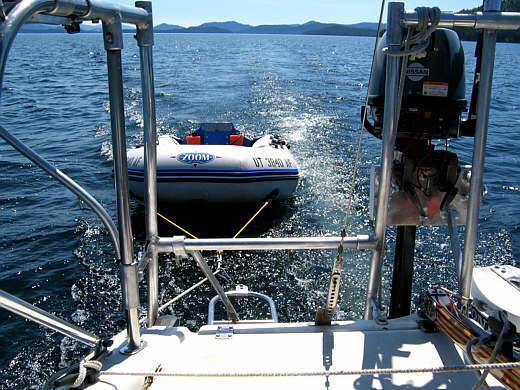
The idea of this towbar is to be able to pull the dingy close to the Mac. This will help to keep the tow lines from tangling around the rudder and outboard while at anchor or sailing in intermittent winds when you are just drifting at times.
...............
This piece attaches to .............
...............
........ the bottom of the swim ladder.
...............
When towing the swim ladder is in this..........
...............
.........position parallel to the water and is held there with ......
...............
.......this bar I made with the ..........
...............
......"U" shaped ends.
...............
Here you can see the support bar in place.
...............
One end goes on the swim ladder that swings and the other on the ladder I made on the back of the boat.
...............
The dingy has two lines attached to each side of its bow and they go to the carabiner on the left side of the picture. The tow line is then..............
...............
..........attached to the same carabiner and goes forward to a cleat on the Mac.
...............
Snap pins were also added ............
...............
.......to the ends of .............
...............
.......... the support bar.
...............
Here is a close up of the tow line attached to the carabiner that is also attached to the dinghy's two bow lines and you can see how the tow rope goes through the carabiner at the end of the ladder. This allows the tow line to be fed out if you want the dingy further away from the Mac or pull it up tight like here and the tow line and dingy can't get into the outboard prop or the rudder.
We replaced the wimpy yellow poly tow line shown above with an ex-halyard line. There is a lot of force on the tow line at times and the poly line never broke, but the new line is easier on the hands and a lot stronger. We continued to use the poly line for the bridle at the front of the dingy (see next picture) for the remainder of 2009, but will replace it with some 1/4 or 5/16 braided line for the use in the future.
We are also looking into a second bridle off the stern that would come forward to the bow one. This way we would be pulling the dingy from the transom and the bow bridle would just act to center the transom one. If this works it would take a lot of strain off of the bow D rings. I'll post pictures and a report on how that works in 2010.
...............
To work the towbar you pull the ladder up and run the dingy line through the carabiner on the end of the ladder. Then the ladder support bar is attached and the ladder pushed down till it is parallel to the water and the upper end of the support bar is then attached to the top of the ladder. Now the two lines that attach to the front of the inflatable can be pulled up to the carabiner at the bottom of the ladder and this will keep the dingy from floating around in every which direction. To attach the dingy to the ladder or remove it takes maybe 30 seconds.
If you want to have the dingy further behind the boat while sailing then just let out the line to the dingy. You can do this at any time by un-cleating the tow line and letting it out or pulling it back in. On our 28 day trip in the summer of 2009 we kept it pulled up to the ladder all the time that we were under sail or power. At night we would pull the dingy up along side of the Mac.
One added benefit of the ladder in this position was that it was very easy to board the dingy as the ladder was like a horizontal platform off the back of the Mac.
Our dingy towing problems that we had the first time out are now a thing of the past. This mod has worked very well, but I don't like towing the dinghy with the outboard on the transom........
........
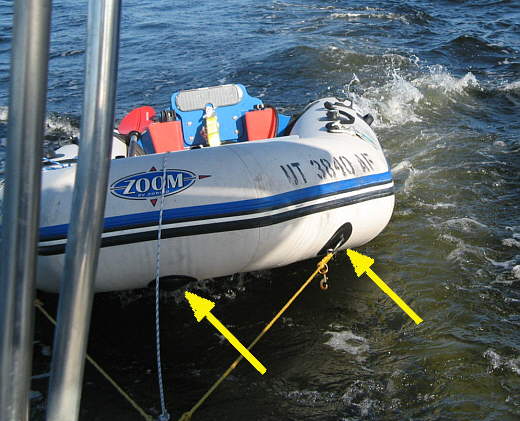
....... so made up a new tow strap arrangement that is much better if we do that. We had never had any problems pulling the dinghy, but if the outboard was on it while being towed the bow was quite high. You can see the reason for it above. We were pulling the dinghy with the bow rings (right arrow) on it and they tend to lift the dinghy up as shown in the picture. The center line in the picture (left) arrow is just a secondary line in case the other line was to break.
I felt a possible solution was to pull the dinghy from the transom instead of the bow. When we went back ashore the first day and went and dumped our trash we stopped at a Walmart......
........
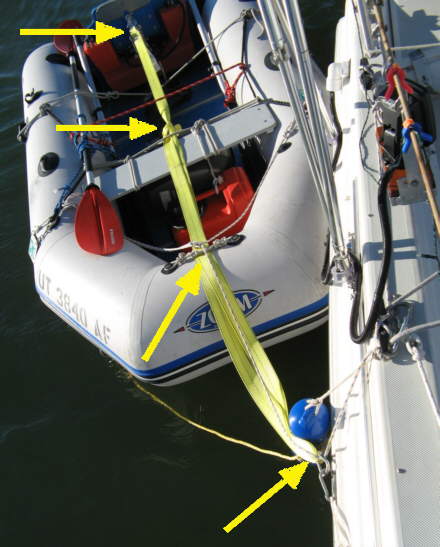
.... and bought the yellow tow strap above. I left the hook on one end and then cut the strap shorter, but long enough to go from the transom (top arrow) out and over the bow up to the carabiner (bottom arrow) that the original tow straps attach to and then back into the boat about where the seat is (second arrow from the top) and tied it back on itself there.
At night we leave the tow lines attached, but pull the Zodiac up along side and clip a short line that is attached to the lifeline stanchion on the starboard side and has a carabiner on it onto the carabiner on the tow line (bottom right arrow) and then I lower a small blue fender over the side at the same point. The Fender helps to keep the noise from the carabiners down during the night when they tend to click against the side of the Mac.
I added the lines at the bow (2nd arrow up from the bottom) to position the strap there also.
........
At the back of the boat (right arrow) I had a line tied from the transom down to the fuel tank (middle arrow). It is there to avoid loosing the tank out of the boat like what happened on the incident at Lake Powell.
I hooked the tow strap hook to that line (right arrow). When using the dinghy you just have to unhook the hook and place the strap inside at the bow of the boat. The left arrow points to where I tied the strap back on itself. Tension on the strap can be set by where this knot is tied.
........
Here is a picture with the 5 HP Nissan tied in the boat under the seat (top left arrow). The lower unit and prop is also tied to keep it in the middle (bottom right arrow). I also placed the dinghy oars (double sided right arrow) along the sides to protect the sides just in case the outboard shifted. I don't use them much as the dinghy doesn't row that well. Usually I sit on the bow seat and use the kayak paddle (top right arrow) to paddle from the bow. This works well. Also note that all of the oars/paddle are tied in to avoid loosing them.
........
Look how much flatter the dinghy now rides in the water and the bow lines are now slack (arrows), so the transom is now taking the strain from the pull and that is pretty considerable if you ever try and hold the tow line while underway.
........
We didn't try it with the outboard in the dinghy, but it was on the floor in there while these pictures were taken. I'm really happy with how easy this mod was and how well it has worked pulling the boat to this point (75 miles).
........
Latter I added flat steps to the ladder and extended it, left arrow, by another rung. The flat steps are a lot easier on the feet and the extra rung makes it easier to board the ladder while swimming. I also added a flat 'face', right arrow, to the one step so that it is easier to stand there while getting in or out of the dinghy.
........
I also had to move the bracket where you mount the tow line back to the dinghy onto the new bottom step. The added mods along with the original ones make towing the dinghy and boarding it really nice.
........
Above you can see the ladder, arrow, and how nice it's location is for use as a boarding platform.


