...Return To Mine & Other Bonneville Car Construction Pages
.Previous Page...............B'ville Car Index Page.........................Next Page
...............................--- Shorten One Half Shaft ---
Using the Datsun rearend has had one shortcoming so far. Since the engine drive sprocket is off-set to the left the rear had to be off-set some also. I mounted the sprocket on it as far to the left as possible, but still the rear sits in the car further to the left than I want.
I have the body of the car centered on the surface plate that I'm building the car on. I moved the motor and rearend as far as I could to the right and still keep it in the present body width. Since there will only be about 1/4 of an inch plunge on the splined haft shafts on the IRS I was able to extend the right shaft almost all the way out and push the left half shaft almost all the way in. I'm leaving myself 1/2 of an inch fudge factor on the plunge even though I think I only need 1/4 inch. Doing all of this still left the left rear tire/wheel 2 inches further to the left of the body than the right rear tire/wheel.
This means that the car wouldn't be completely symmetrical as viewed from the front. The pod that will run down the left side of the car and that will cover the axles and suspension components would be 2 inches wider than the one to the right of the body. This pod will be about 7 inches high. This would result in 14 square inches more frontal area on the left of the body center than the right. Maybe not enough to matter, but after talking to Tom and Harv I decided to try and minimize it as much as possible. If I could shorten the left half shaft in some way, that would help. Out of all the options available to me the only one I though I could do with my equipment was to shorten the inner half shaft. I felt I could shorten the end of it by doing some machine work on the end to mimic the current end and then cut an inch or so off. This will still give me room for the balls and spacers that transmit the power from the outer haft shat to the inner one and still allow it to telescope in and out under suspension travel.
................. .
.
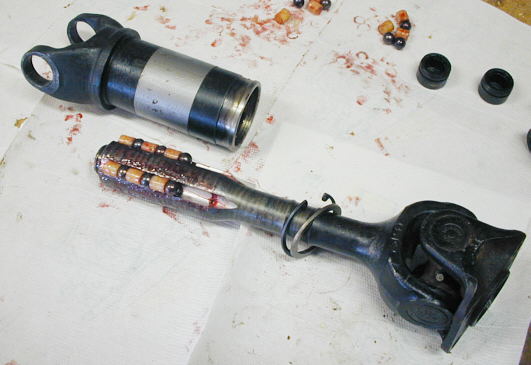
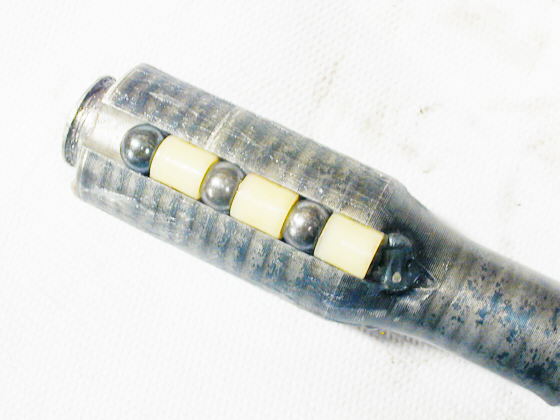
Here is the half shaft taken apart. You can see the grooves that the balls and spacers ride in. You can also see they are longer than the balls and spacers. Since I won't be having that much suspension movement I feel I can shorten the bottom inner shaft. That will allow it to plunge deeper into the outer shaft on the top. (note: In the picture above the balls and spacers are reversed from how they are actually installed. On the left end should be a ball and the last thing to the right should be a spacer)
............ .
.
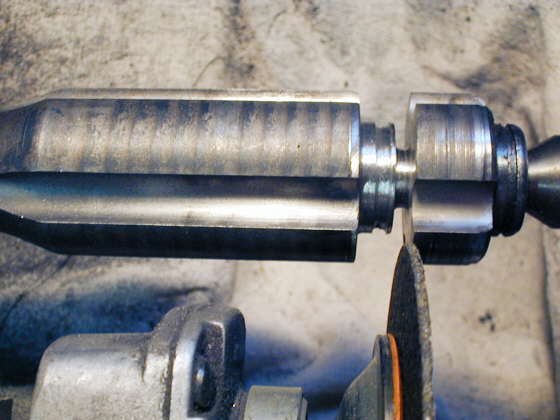
A couple months ago I had tried turning the end of the shaft on my lathe with my normal cutting tools. The shaft is hardened and my tools wouldn't even make a dent in it. At that time someone mentioned doing it with a grinder mounted on the cross slide of the lathe. I had my doubts about getting in over my head and didn't do it. Recently Tom e-mailed me the same suggestion and my friend who gave me the Datsun rear end said he had two more half shafts I could have as spares in case I messed this up, so I decided to go ahead and try it.
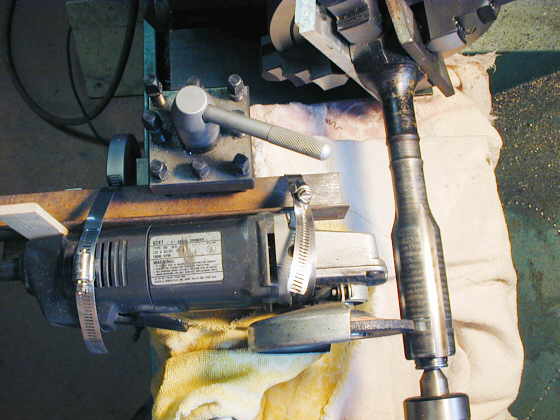
I mounted a piece of angle iron in the tool holder on the cross-slide of the lathe and then used hose clamps to mount the grinder to that. I used a shim to get the grinding wheel vertical and at right angles to the work piece. The U-joint end of the shaft is in a 4 jaw chuck at the top of the picture and the other end is held by the live center in the tailstock at the bottom of the picture.
............... .
.
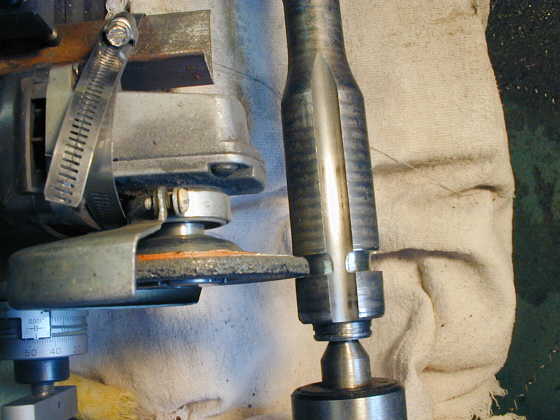
I then scored a reference line around the piece where I want to machine up to. Using a new 1/4 inch wheel in the grinder I roughed in the area and got it close to the proper width and depth using the feeds on the cross-slide. I tried a couple different speeds for the lathe and ended up using about 300 rpm, but don't know what you should use. With the workpiece turning and the grinder turning this went pretty fast.
You can also see I used some towels to cover the ways and as much of the lathe as possible while doing this. Actually most of the grit got thrown up and to the back of the lathe and wasn't near as messy or hard to clean up as I thought it was going to be.
............... .
.
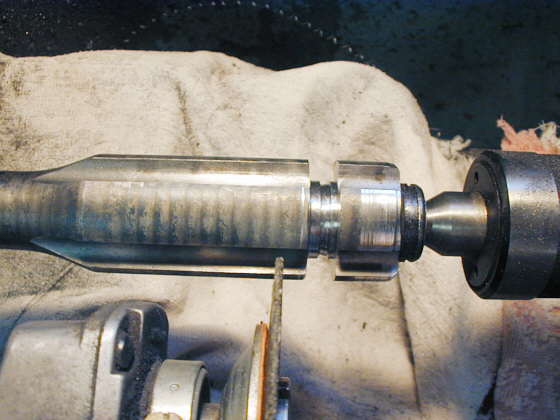
Next I switched to a new 1/16 inch cut-off wheel in the grinder. Using that I was able to finish the sides nice and flat and also get a nice uniform diameter on the shaft. I had the groove for the snap ring nice and then started to play with that and made it a little wider than I would have liked to, but it seems fine. So what I was doing at this point was making a new end for the half shaft 1 inch in from the original end.
...............
Next I used the cut-off wheel to start a cut to separate the end from the half shaft.
..............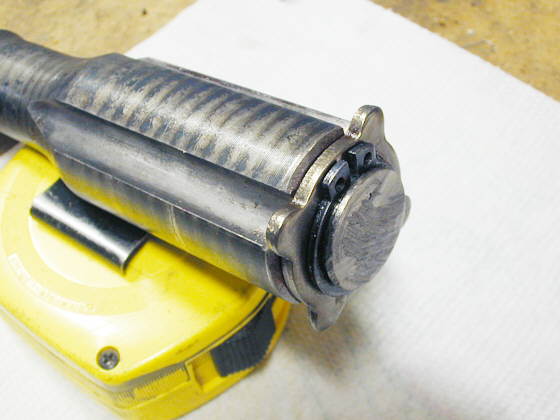
I took the shaft out of the lathe and cut the rest of the end off by hand with a cut-off wheel. Here is is assembled with the retainer that stops the balls and spacers from sliding off of the end as it plunges in and out of the outer shaft. I didn't like the little bit of play that resulted from screwing up the groove for the snap ring so I made a spacer out of .030 aluminum that fits between the snap ring and the retainer. It is not in this picture.
..............
I also had to do one final modification to the shaft. The grooves on the shaft for the balls and spacers are long enough on the original shaft that the balls and spacers can not slide past the end of the groove during the full movement of the shaft in and out. With the shaft being shorter the shaft can now slide into the outer shaft far enough that the balls/spacers could slide out of the grooves. I welded a short bead at the end of each groove (next to the yellow spacer in the picture) to limit the distance the balls/spacers can now slide.
This all was about 4 hours of work, but it helped me get rid of one of the 2 inches of offset on the car I was worried about. I'm considering using a 1/2 inch spacer along with longer wheel studs on the right wheel. That would get me down to 1/2 inch off, which I could forget about or I could make the body 1/2 inch wider.
Tom had a very good suggestion that I could have used if I hadn't already
bought my wheels. I could have ordered the rear wheels with different offsets and that would have also helped.
..................................................................Next
Page