...Return To Mine & Other Bonneville Car Construction Pages
.Previous Page...............B'ville Car Index Page.........................Next Page
.........................................-- Chute Doors Part I --
I had started the gas tank and finished the 2nd battery box and was waiting on an order that had weld in bungs for the gas tank and water tanks along with parts to finish the steering on the car. So in a moment of probably not too bright thinking I decide to work on the chute doors. I want the back of the car to close in like the tail on an airplane and that meant I had to have doors that would open to allow the chutes to deploy. I'll continue to document this stage of the build, but who knows if at some point I throw it all out and start over with it. I wanted hinges for the doors to open the front of the door first to allow air to come in behind the door and hopefully help open it. At least I figured the spring needed to open them would be less as the doors wouldn't be opening in a backwards "V" shape that would be an air brake. Not a bad idea, but then everything would have to be much stronger.
.................. .
.
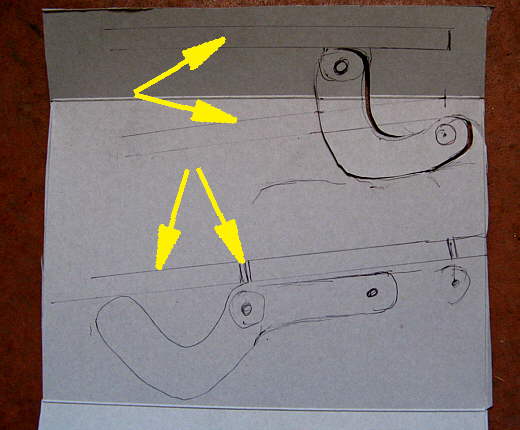
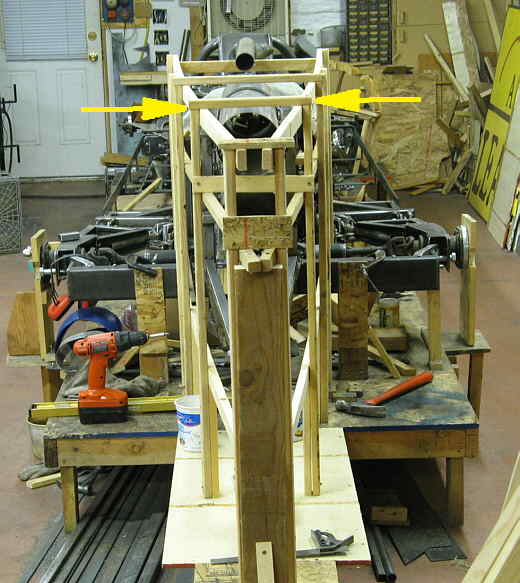
The bottom left arrow points to the door and the bottom right points to the hinge area where the panel to the right of the arrow is fixed and the panel to the left of the arrow is the door. The top two arrows point to the door in the close position (bottom-top arrow) and the very top arrow points to the door in the open position.
.................. .
.
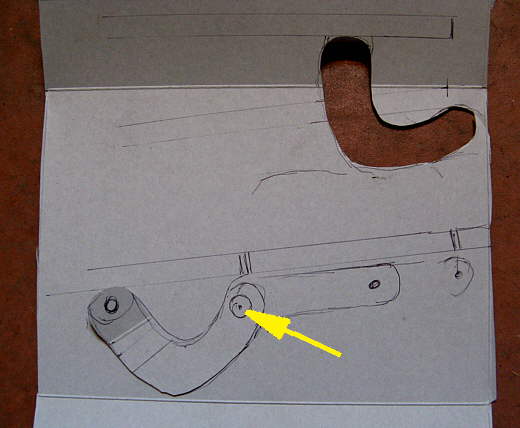
Next the hinge was cut out of the top and put on the bottom. I put a thumb tack up through the sketch and pushed the hinge through it (arrow). This allowed me to observer it's movement. After a couple tries at this and figuring in my head what had to happen.....
.................. .
.
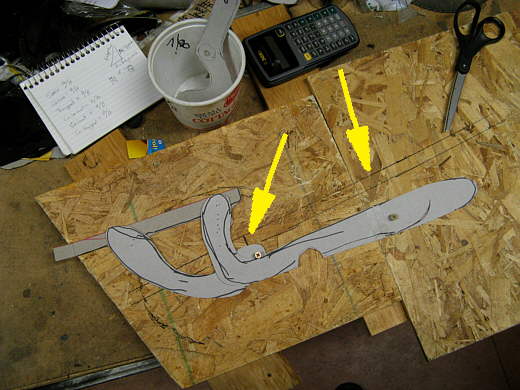
............. I came up with two hinge pieces held to the board with screws and attached with thumb tacks to a straight piece that represented the door. It was lined up with the body line drawn on the board. Now I could......
.................. .
.
.................. rotate all of this on the screws and see if it opened. As you can see it opens away from the body line and due to the geometry of the hinges and their pivot points it opens to leave an air gap behind it and opens so that the further you get from the chute tube, which is at the hinge point, the wider it gets. See the note pad in the picture that has a triangle on it and which sides make up the sin, cosine, tangent, etc. of an angle?? Well when I started this I found out my previous attempt at trig had failed and the rear of the car had to be moved back about another 2 feet to keep the angle of the sides as they came together under 7 degrees. The 7 degrees comes from the fact that many feel if you keep the angle of the body to 7 degrees or less as it taper towards the rear you have a better chance of keeping the air closer to the body, not really attached any more but still the best you can do aero wise back there. Now I would like to say that the hinge above was the final choice, but it wasn't I didn't like the two overlapping pieces of it and came up with a much better one. Sorry no pictures yet, but they will be posted in another page or two.
.................. .
.
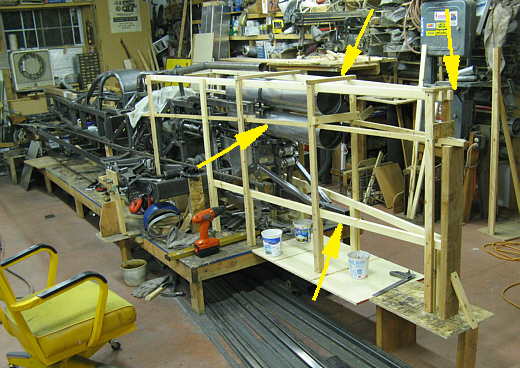
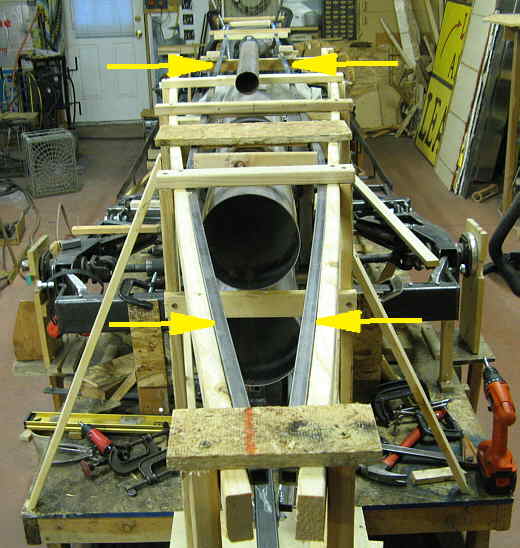
To make the doors I had to determine the shape of the car in that area. I started with the bowed piece (left middle arrow) and bent it so that it started tapering from the middle of the car at it's widest point rearwards to the very tail of the car as mandated by the 7 degree thing. Then directly above that using a level I located a piece that was parallel (level) with the ground an would represent the top of the chute door at the back (the area between the top two arrows). Directly below that curved piece I located a piece that went to the rear of the car and would represent the bottom of the chute doors. So from the back of the chute tubes to the very rear of the car the tail will be very flat sided vertically with a little curve from top to bottom at the forward edge of the door. On another note if you look to the very right side of the picture you will see a vertical piece of wood attached to a wood base with an angled piece of wood attached to it that keeps it perfectly vertical. I slide that up to the edge of the build table and measure horizontally from it to a point on the car. Then I take it to the other side and measure to the same point on the other side. This is how I keep both sides of the car pretty symmetrical with each other.
.................. .
.
This view from the rear shows the angle that the very back of the car will come together at from the chute tubes (two arrows) to the end of the car. At this point I had also removed the bowed reference piece of wood as it was not longer needed.
.................. .
.
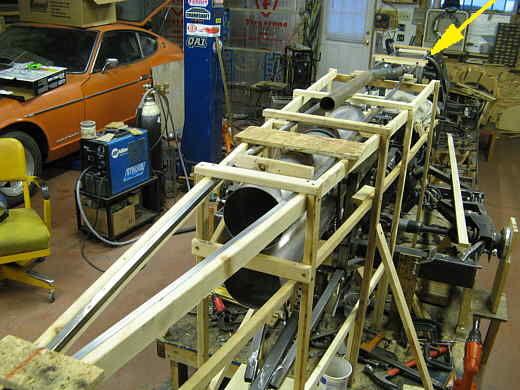
Next I c-clamped some 1/2 X 1/2 thin wall square tubing to the upper form. You can see at the chute tube where it bends and then goes forward to the top of the cage. This will be almost the top of the car except the body will be made to go up and around the exhaust and air inlet further forward. The square tubing looks large in the picture, but it is only the size of one of your fingers. Near where it bends it will be cut and the rear pieces (two arrows) will become the top of the chute doors.
.................. .
.
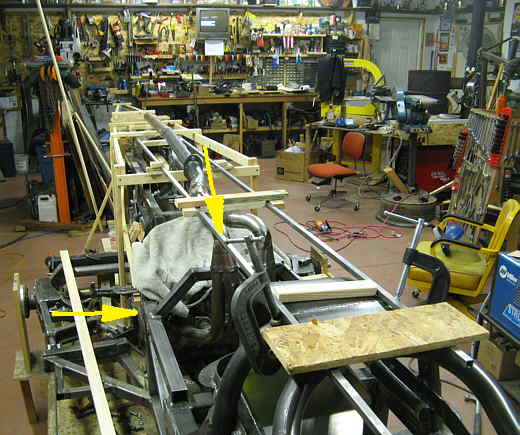
The two pieces of tubing are only 8 1/2 inches apart and end up at the cage (arrow). The wood form follows the shape of the car down at the mid section where it is widest. In the back ground you can see Shaun's '73 Datsun Z car. We are putting a small block chevy into it that I had along with a 200R4 overdrive transmission. He is about 22 and interested in cars and comes over around 5 when he gets off of work and works for a couple hours.
.................. .
.
This shows the square tubing from the cage looking back. Imagine the shape of the car in this area going from the top arrow in a quarter circle arc to the bottom left arrow and from there pretty much straight down along the side of the car to the pod where that piece of wood is laying (back of the bottom left arrow). The body will then go straight out the pod to it's outboard edge and then down 6 inches and back to the main body along the bottom of the pod and when it gets to the main body the body will then arc underneath and come up the other side.
Now that I have all of this stuff in the way I can't get to the gas tank in the car. Also since the car is now longer at the back the chute tubes were moved back about 8 inches. This means I'm going to have to change some of the mounts for them. Also now I need to move the chute line attach point further back and also make the push bar longer.
..............................................................Next Page