Here is a wood burning stove you can build yourself and it works good. I heated my house in Wyoming (sole heat source other than solar) for years with this stove and now heat my house in Utah with it. I used a hot water tank and some flat sheets of steel and a big nut and some bolts to add some character to the door..
...............
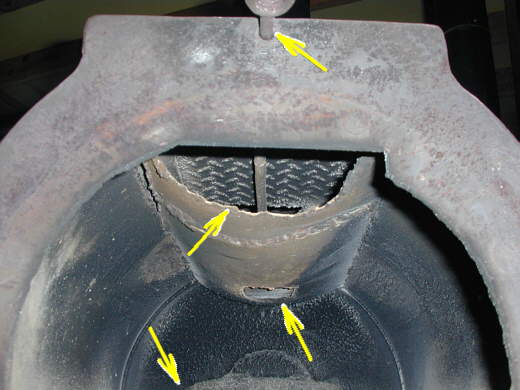
I wanted a horizontal stove that I could also cook on if needed. The top left arrow is the chimney stack. The bottom left arrow is where the fresh air enters. The bottom right arrow controls the intake air. The middle right arrow is the door handle made from chain I welded together and the top right air controls an exhaust port in the stove.
In the Wyoming house I had 4 inch plastic pipe that went from the stove under the floor past the outside wall and then went up just outside the house. This supplied outside air to the stove. In my current house I have a 4 inch pipe that goes next to the exhaust pipe up into the attic so the outside air comes from the attic. This outside air is important as all the air that a stove burns and that goes up the chimney has to come from some where. With a normal wood burning stove all that combustion air comes in from the outside around your doors, windows, and any other leaks to the outside of the house. So while the stove is burning you are pulling in cold outside air that has to be heated as it moves through the house to the stove. I also had this stove hooked up in Wyoming after I build an addition so that the air came through an outside wall right to the stove.
...............
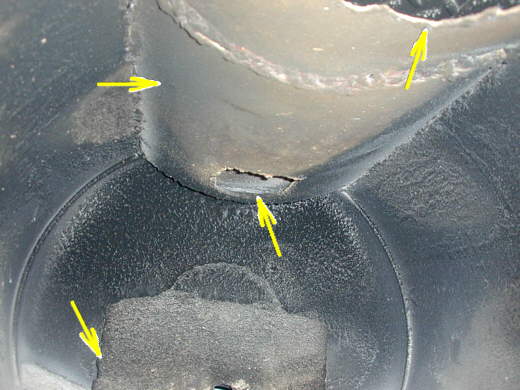
I cut a section out of the top of the water tank (the top now with it laying
horizontal). I turned it over and welded it back on to the stove upside down (top arrow above and top left arrow
in the next picture). Then I built the short vertical sides above this area and the taller sides at the back of
the stove and welded in flat plate at the top for a cooking surface. By turning the one piece upside down and constructing
the cooking surface above it I created a baffle/channel that the burnt gases have to follow to get to the chimney
pipe. This is very important as now the hot gases don't just go out the back of the stove and up the chimney. They
have to go towards the front of the stove by the door, up the front, back under the cooking surface (top arrow)
before they can go up the chimney. This heats more of the stove surface and thus the room/house with less wood.
Since the air enters the back of the stove (bottom left arrow) and not at the door it feeds the fire and then burns
and exits as was just explained in a much more efficient path.
...............
This air flow path works very well except for when you are starting a fire. It is easier to start a fire by putting the wood and some paper under it at the front of the stove and have the door open a little, but now the previous air flow is working against you. It is like trying to start a pile of brush on fire from the side where the wind is blowing in your face vs. the other side where the fire is blown into the brush. To help this situation I put a hole in the top of the back of the stove that goes up into the top chamber (arrow at the middle of the picture). I then made a plate that can close that hole off once the fire starts. The plate is welded to a rod that goes out the front on the stove (top arrow next picture). Pull the rod out and the hole is uncovered. Push it in and the hole is covered and the exhaust gases have to go past the front of the stove before they can get to the chimney.
...............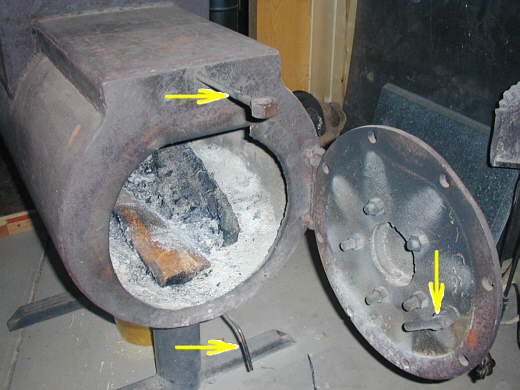
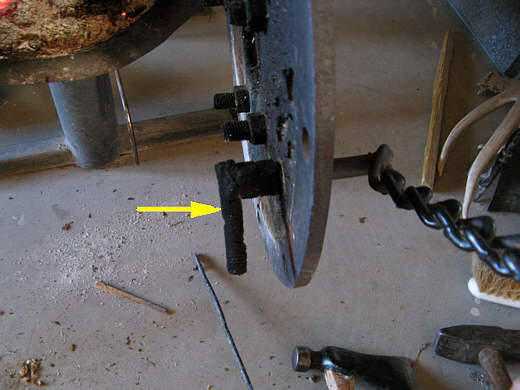
To make all of this work good one more thing has to be controlled and that is the intake air. There is a rod/handle (bottom arrow above) that goes to the back of the stove where it is hooked to a lever arm that attaches to a damper (butterfly) in the air intake at the back bottom of the stove (see bottom left arrow next picture).
...............
Here is a view of the back of the stove showing the air intake and the chimney fitting. Both of these were made from some scrap pipe. There is also a damper in the chimney. You can control the way the fire burns with either the air inlet damper and/or the chimney damper.
...............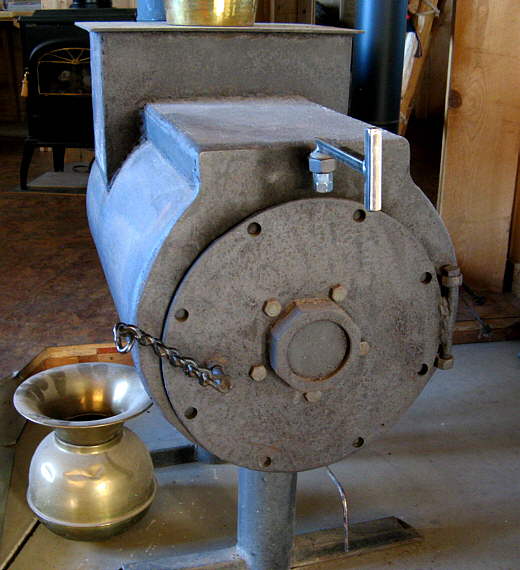
The door was some scrap steel at the scrap yard that was already the round shape and had the holes drilled in it. I guess it was for something and wasn't made right so they threw it away. There was the hole in the front and I found a huge nut at the yard also and welded a piece of metal inside the nut to close it off and then welded the nut over the center hole in the round piece of steel that is the door.
...............
It is thick enough that it hasn't ever warped and fits snug against the stove, since the handle assembly (arrow) and pulls it tight against the front of the stove. The arrow points to the latch which is no more than a round rod welded to the inside of the handle assembly. It is bent so that as you turn the handle the bent part wedges against the inside of the stove and sucks the door up against the stove. To start the stove I turn the handle and just leave it loose so that there is about a 3/8's to 1/2 inch gap between that side of the door and the stove. I have a concrete floor under the stove, so if some hot ember would come out during that time of starting the fire I don't catch the house on fire. You should be very careful anytime you have the door open at all with a fire in the stove.
=============================================================
Let me take you through operating this stove. To light a fire I close the air intake damper (bottom front handle) so air is not entering the stove from the back. I pull the top handle on the stove out and that opens the hole (exhaust port) at the back top of the stove and makes a shortcut for the exhaust gases to flow into the chimney. I put in 3 pieces of wood with some wadded up newspaper between them and lay some more on top. I then light the fire and leave the front door open an inch. The air comes in the door to the fire, which creates a fast hot fire with the paper and ignites the logs. The smoke/exhaust goes to the back of the stove up through the open exhaust port and out the chimney. Once the fire has started (3-5 minutes) and established itself I open the air intake at the bottom back of the stove with the lower handle at the front. I then also close off the exhaust port at the top back of the stove with the top handle by pushing it in. Finally I close the door tightly with the door handle. It rides on a ramp like piece inside the door so as you close the handle it pulls the door tighter so we aren't burning room air.
Now the air comes in the back bottom, feeds the fire, the exhaust air goes to the front of the stove and makes the turn up into the cooking chamber and returns to the top back of the stove and out the chimney after heating all the stoves surfaces. You control how fast the fire burns with the two dampers.
You can make this stove cheap, it doesn't look bad and I'll put it up against any high dollar wood stove you can buy for efficiency. This stove provided all the heat for my house in Wyoming where the temperature can get down in the -30 range and also supplies all of the heat in my current Utah house where it gets into the single digits.
----------------------------------------------------------------
Some closing thoughts:
Remember this stove gets it's air from the outside through the air intake
pipe. Air will move to the fire through the least restricted path. The cold air dropping or coming in from the
air intake will be less restrictive than trying to go past the edges of the door.
It is all about air flow with a fire. You want to control the air flow amount and the direction of the air to the
fire for combustion. Then you want to control the hot exhaust after the fire for maximum heating of the stove's
surface. This stove does that, buy allowing the air to flow to either the fire by opening the door slightly and
opening the rear exhaust baffle for starting the fire then reversing the air flow and exhaust after the fire starts
by closing the door and top exhaust baffle for maximum heating of the stoves surface.
I strongly recommend bringing outside air to the stove for combustion vs. using inside already heated air for combustion
which then has to be replaced by cold outside air flowing into the house and through it from around the doors and
windows.
If you can't use outside air the stove is still handy for it's easy starting mode and then for the benefits it
has for moving hot air over a lot of it's surface before going up the flue pipe.
................................................................Back to House Index Page
.................