...........Navigational Aids Index....................... Next Page If There Is One
.--- Converting a USGS Topo Map to SeaClear ---
Read this Note Before Continuing: The following is how to convert a USGS Topo Map to SeaClear. The resulting
maps that you create are only navigational aids and are not replacements for navigational knowledge, nor should
you trust them as your only navigational means and by following the instructions below you acknowledge that fact.
How many times would you like to have a map or maps of your favorite inland lake or a coastal area to use with
the free SeaClear
PC Chart plotter and GPS Navigation software. On
this page I'll go through the steps. They will seem many and complicated at first, but once you do it a couple
times you can have a USGS Topo map converted and up and running in SeaClear in less than 15 minutes.
The following will require that your are familiar with the folders on your computer and where they are located
and how to move files between them and how to have more than one program running at a time. I also will assume
that you know how to use SeaClear itself and how to find and use a map that is available to it.
I would print this page out and then follow the instructions below. Once you have followed these instructions you might see shortcuts you can take with software that is available to you. Keep that in mind and don't get discouraged as the rewards are great,
Sum
........................
Note: The following steps were done on a computer using Vista. If you are using
a different operating system you might have to tweak some of the steps outlined below, but the overall process
should be the same.
Downloading a USGS Map to your computer and saving it:
1. Go to the USGS Map Locator page ( HERE )
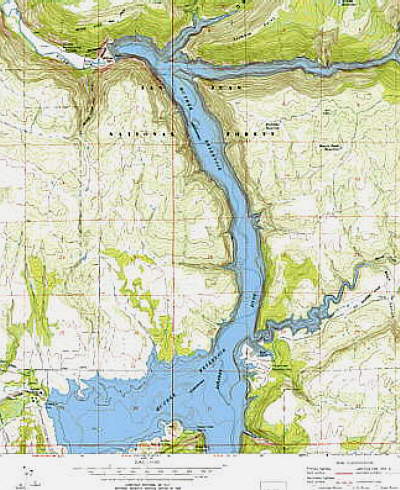
2. Find your area of the country on the map and keep zooming in on the map until you locate it. For this example we will look for the map for McPhee Reservoir just north of Cortez, Colo.
a.) Do their "STEP 1" and zoom in on the map on the 4 Corners, where Utah, Colorado, New Mexico and Arizona come together. You will see Cortez in SW Colorado. McFee Res. is just north of Cortez right by Dolores. Zoom in until you see it.
b.) Move on to the next part of their "STEP 1" and click on the "mark points" button and then double click on the lake itself.
c.) Next follow "STEP 2" and click on the "MARKER" you created at the lake.
3. A window will appear with choices for 3 maps that are available. Let's download the 1993 Trimble Point 7.5X7.5 map.
(Note: The 7.5X7.5 map will show a smaller area with more detail. The 30X60 Dove Creek map will show a larger area with less detail. You can download either or both depending on how much detail you want.)
a.) Click the "DOWNLOAD" button for the 1993 Thimble Point map.
b.) In the next window click on the "SAVE" button. It will want to know where you want to save the file. Create a folder where it will be handy. For example click on "DESKTOP" and then "RIGHT CLICK" in the window and click on "NEW" and then "FOLDER" and type in the folder name "MAPS". Open "MAPS" and click on "SAVE".
c.) When the file is finished loading click on "OPEN FOLDER"
d.) Double click on the file name to 'un-zip' it.
e.) The 'un-zipped' file should appear and we now have the map in PDF format on our computer.
Capturing the map image:
1. Double click on the file name to open the PDF file. The map should open and you should see the northern 1/2 of McFee Reservoir.
2. Change the "zoom percentage" at the top of the map from whatever it is to 125% for a 7.5 X 7.5 map (I use that, but you may experiment if needed. For a 30 X 60 map I change the zoom to 150%).
3. At the top of the page use the "TOOLS" option and then "SELECT & ZOOM" and then the "SNAPSHOT TOOL".
4. Using the "bars" at the right and bottom move to the upper left corner of the map.
5. Press and hold the 'left mouse button' and 'drag' down to the lower right corner of the map. Hold it down in the right corner until the map moves there.
6. Release the 'left mouse button' and wait until the window appears telling you "that the selected area has been copied" and then click "OK".
7. Move the mouse into the copied area and "RIGHT CLICK" and a window will appear. Click on "COPY SELECTED GRAPHIC". Give it a chance to finish this as it will take 1/2 minute possibly.
Note: If after moving past this point you lose the image you will have to return and repeat the above step.
Converting the map from PDF to a .bmp format:
Note: At this point you have a couple of options, but what you need to do is copy the image into a graphics program where you can then re-save the image into a .bmp formatted file. I use a program that is no longer available. For this example I'll use the Microsoft Paint program that comes with most versions of Windows, but you could use about any graphics program that will let you past the image you now have in memory into a blank page and then save it as a .bmp file.
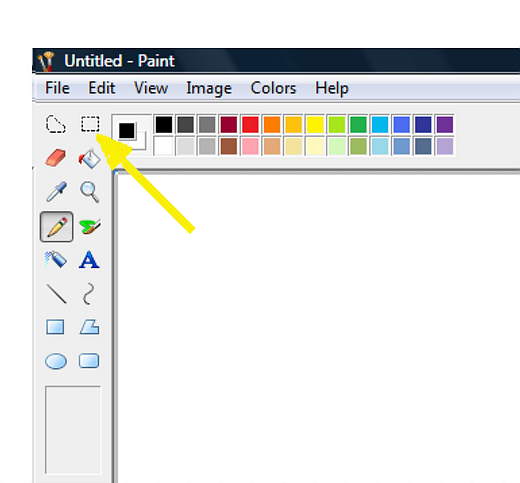
1. Open "PAINT" on you computer (or another program that will work).
........................
2. Click on the "SELECT" tool at the top of the tool bar (arrow above is pointing to it) and then using the mouse drag and open a window across and down the screen with it and release the mouse button when done. This creates a place for the map that you have copied previously to be pasted into.
3. Position the mouse in the new 'window area' and "RIGHT CLICK". A window should open and if so click on "PASTE". It might take some seconds, but the map you copied from the PDF document (the map) should appear on the screen. If it doesn't go back and recopy the map to memory.
4. You can scroll around the screen and you should see the whole map. Don't mess with it at this point in any way.
5. Click on "FILE" then "SAVE AS".
6. Before you save the file move to the "MAPS" folder you created by clicking on "DESKTOP" and then the "MAPS" folder. Now that you have things set to save the file in the correct place continue.....
7. Go down the page to where it asks for "A FILE NAME" and name the file. I will use the name 'Trimble Point 7-5 X 7-5'. Input the name and then right below there....
8. ... is a small window where you can set the file type. Click on the "DOWN ARROW" to the right and then click on "256 COLOR BITMAP" to create a .bmp file. If a window comes up with a warning, just click the "CONTINUE" button. It will be fine.
9. Now we have the map in a .bmp format that SeaClear can work with. It seems like a lot, but once you do this a couple times the longest part is waiting for the map to download off the Internet.
Move the file to the SeaClear "CHARTS" directory:
1. Copy the file ( Trimble Point 7-5 X 7-5 ) to the SeaClear Charts directory.
2. On my computer I can find that directory by going to "COMPUTER" (click on the Microsoft Icon at the lower left of your screen and then "COMPUTER"), then open the "C:" drive by clicking on that, then click on "PROGRAMS", then on the "SEACLEAR FOLDER", and finally open the "CHARTS FOLDER" and past the file in there.
Calibrating the file so that SeaClear can recognize it and use it.
1. Open/Run the "MAPCAL" program that is a 'calibration utility' that comes with SeaClear.
2. Open the .bmp map image you created and copied to the folder. Click on "FILE", then "OPEN IMAGE", then on the map name. The map will open on the screen along with a window for "CHART INFORMATION".
3. Enter the name of the map, Trimble Point 7-5 X 7-5 or whatever name you now want on the map. If you work with different maps in different states you might want to put the state abbreviation in front of the Trimble Point or something else.
4. Enter the "SCALE" as it will also be indexed later on the map scale. In our case this map is 1 to 24,000 and is found at the bottom middle of our map (a 30 X 60 will be 1 to 100,000). Look back on the the PDF version of the map if in doubt or close the "CHART INFORMATION" window and look at the bottom and then re-open the window.
5. Click "OK" on the "CHART INFORMATION" window which will save the name and scale.
Setting 4 Calibration Points......
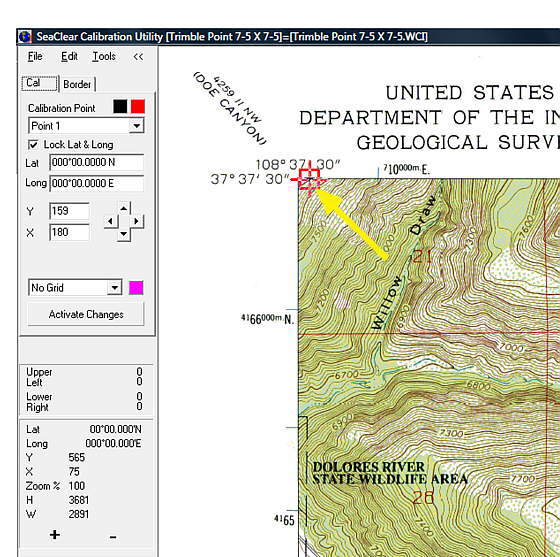
1. Next we will set 4 calibration points. Move the cursor to the "HASH MARK" at the upper left side of the map where ....
........................
.... the latitude and longitude are displayed and "RIGHT CLICK" the mouse on the "HASH MARK" and click "ADD NEW CAL. POINT" and a 'red marker' will appear on the screen.2. Next put in........
........................
.....the Lat and Long (see arrows above). On the "Long" change the "E" to "W" if you are in the U.S. and maybe other places. Click on "ACTIVATE CHANGES" each time you enter a new calibration point.
3. Now we need to do this to the other 3 corners of the map. Scroll down to the "HASH MARK" at the lower right of the map and "Right Click" on it and "ADD NEW CAL. POINT" for it also being sure to change the "E" to "W" on the "Long".
4. Next follow the same steps to mark the hash marks at the upper right and lower left. At this point you should have calibrated the 4 corners of the map at the "HASH MARKS" , not the actual corner of the map.
Setting Border Points.....
1. The calibration step above was done so that SeaClear can locate you/your boat on the map when connected to a GPS or can send the route you create to a GPS based on the map.
2. Now we will set the "BORDERS" of the map and this will be the map that you will be able to see with SeaClear past the actual TOPO map, such as the map name and legend, etc..
3. Click on the "BORDER TAB" near the top left of the screen above where you inputted the Lat/Long.
4. Scroll to the top left of the map and decide where you want the border to be there and "RIGHT CLICK" the mouse and then click "ADD NEW BORDER POINT" and again you will place a red marker there.
5. Scroll to the upper left side of the map and repeat the above. It the line from the first mark to this second mark is not straight then drag the mark up or down until you have a straight line.
6. Scroll down to the lower right side and repeat and finally to the lower left side and repeat. At this point scroll around and make sure you have all of the info you want within the border you created. If not move the border marks until you do. You also have the option of the "SET BORDER TO EDGE OF IMAGE" button if you want to take the easy way out.
Saving the Calibration........
1. To save the calibration you just did click on "FILE", then on "SAVE CALIBRATION" and "OK" at the upper left.
Convert to WCI Format........
1. At the top of the screen Click on "TOOLS", then "CONVERT", then "CURRENT TO WCI"
Scan for New Charts.........
1. At the top again click on "TOOLS", then "AUTOLOAD LIST", then "SCAN FOR NEW CHARTS". It should show one new WCI file found.
Congratulations you should be done and you can now Open/Run SeaClear and you should find the new chart in the "CHART LIST".